How to Make 3D Prints Stronger
2025-12-10 | By Andrew Kazour
3D Printing 3D Printer Filament
How to Make 3D Prints Stronger
3D printing opens the door to rapid prototyping, custom parts, and hobby projects! Sometimes it can be tough trying to figure out what options to choose while printing. Strength in 3D-printed parts depends on more than just the material you choose. The way you design, slice, and print directly affects durability. Here are the key ways to make your 3D prints stronger.
1. Choose the Right Material
Not all filaments are created equal. PLA (polylactic acid) is easy to print but brittle. Most people start with PLA, which is fine for many circumstances. For stronger prints that will be under stress:
- PETG (polyethylene terephthalate glycol) – More flexible and impact-resistant.
- ABS (Acrylonitrile Butadiene Styrene)/ASA (Acrylonitrile Styrene Acrylate) – Tough and temperature resistant.
- Nylon – Excellent strength and durability, though trickier to print.
- Carbon fiber–reinforced filaments – Provide stiffness and strength for functional parts.
Your specific application will change exactly what you need from your material. If you want to make something but PLA is just slightly not strong enough, then choose PETG. If you need something a lot tougher, then you have all the other options from above.
ABS is a very strong material; however, it is hard to print properly. To safely print ABS, you need to have an enclosure around your printer to keep you safe from fumes. Also, we need to make sure our hot end is at the right temperature, which is 230-235 °C for the nozzle, 80-90 °C on the bed. Some printers can't even get that hot on the bed, so it is something to watch out for. When you are storing your filament, make sure it is dry, so it prints properly. The best way to do that is with a filament dryer box, and this is especially important when working with higher temperature filaments like ABS and ASA.
Nylon and Carbon fiber filament also need to be cared for in the same way as ABS. The packaging states the correct temperature as well as bed heat. That is the best way to start trying out printing with these tougher materials.
2. Optimize Print Orientation
3D prints are strongest in the XY plane but weakest along the Z-axis, where layers bond together. This means that your print will be weakest parallel to the layer lines. You always want the stress of your prints to be perpendicular to the layer lines for maximum strength.
- Orient your part so the main stress runs along the layer lines, not against them.
- For example, a hook printed standing up is more likely to snap than one laid flat.
Think of the layers like wood grain—design and orient to avoid splitting. This will heavily impact the strength of your prints, but requires a lot of planning and printing for your design.

3. Adjust Print Settings
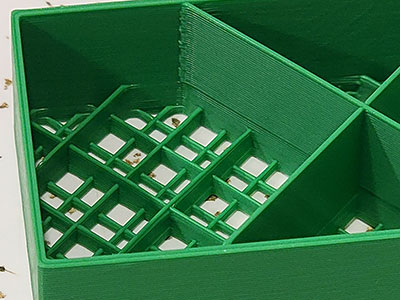
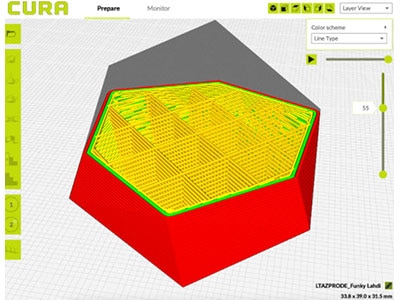
Slicer settings play a huge role in part strength. You can change the infill, wall amount, brick layering, and more. The most important ones would be infill and walls; they are also the easiest to change. First thing is the infill pattern, which should be changed to Gyroid as it is regarded as one of, if not the, strongest patterns. Honeycomb is also a good pattern for strength, but the sine wave pattern of gyroid offers better strength in more directions.
 Gyroid (20% infill)
 Honeycomb (15% infill)
It is a common misconception that more infill is the main way to get a print stronger. This is wrong, though, as after a certain point, you get diminishing returns. Increasing the walls is more effective as it adds much more structure to the part for less material used. Adding more walls is basically adding 100% infill around the edge of the part, which provides the best structure.
- Infill percentage & pattern – Increase infill (30–50% for functional parts). Solid infill isn’t always necessary; patterns like gyroid or cubic provide excellent strength. After a certain point, infill becomes less efficient.
- Perimeters (walls) – Adding more perimeters often strengthens a part more efficiently than just adding infill. Aim for 3–5 walls for structural parts.
- Layer height – Thicker layers (0.2–0.3 mm) can improve bonding between layers compared to very fine layers.
- Print temperature – Ensure you’re printing hot enough for good layer adhesion without overheating.
 7% infill Gyroid
 15% infill Grid
 5 walls instead of standard 2 walls and 20% infill
4. Improve Adhesion Between Layers
Weak inter-layer bonding is one of the most common causes of print failure. If the layers don’t bond strongly, your part can become brittle and prone to splitting. To address this:
- Print at the Upper End of the Recommended Temperature: Each filament has a temperature range that ensures optimal adhesion. Printing at the upper end of this range allows the filament to bond more effectively between layers.
- Reduce Cooling: Cooling fans can help improve print quality for many filaments, but for materials like ABS or PETG, reducing cooling speeds can help improve layer adhesion. For ABS, keep the cooling low during the first few layers and adjust based on results.

5. Reinforce with Design Techniques
The strength of a print is not just about the material or print settings—it also heavily relies on the design itself. By incorporating strategic design elements, you can significantly improve a part’s durability.
- Add Fillets and Chamfers: Sharp edges or corners can act as stress concentrators, leading to cracks. Rounded edges or chamfered corners help distribute stress more evenly and reduce the likelihood of breakage.
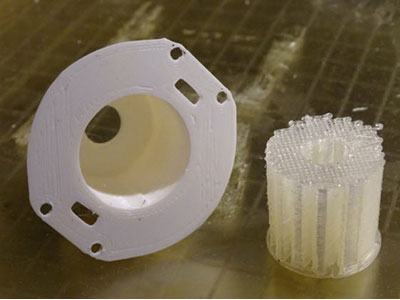
- Use Ribs or Gussets: These are ridges (like little poles) added to flat areas of a design to reinforce sections that are prone to bending or breaking. Ribs can be especially useful for adding rigidity to thin parts without adding a lot of weight or material.
- Avoid Sharp Corners: In many 3D printing materials, sharp corners are weak points that can lead to failure under pressure. Instead, incorporate curves or rounded transitions to help the material handle stress more evenly.
- Split Large Parts into Smaller Pieces: Sometimes a part is simply too large to print optimally in one piece. Consider breaking down large prints into smaller, more manageable pieces that can be printed with strength in mind. Once printed, these pieces can be assembled into the final product, often with added strength.
 Image from Wikipedia (https://commons.wikimedia.org/wiki/File:Wing_structure_-_ribs.svg)
6. Post-Processing for Extra Strength
Even after your print is complete, there are a few additional steps you can take to boost its strength and durability.
- Annealing: For materials like PLA or nylon, annealing can significantly improve strength and heat resistance. This involves baking the printed part in an oven at a controlled temperature to encourage the material’s internal crystalline structure to form, making the part tougher and more heat-resistant.
- Epoxy Coating: A layer of epoxy resin can add strength, durability, and impact resistance to a 3D print. By brushing or dipping your print in an epoxy coating, you can improve its overall performance and protect it from wear and tear.
- Metal Inserts: For parts that require screws or bolts, instead of relying on plastic threads, use threaded brass inserts. These provide a much stronger, more reliable method of securing parts together, preventing the threads from stripping or wearing down over time.
 Image from Wikipedia (https://commons.wikimedia.org/wiki/File:Annealing_a_silver_strip.JPG)
Conclusion
Making 3D prints stronger isn’t just about cranking up the infill. It’s a mix of material choice, print orientation, slicer settings, and smart design. By optimizing these factors, you can produce parts that don’t just look good—but can actually handle real-world use.